These burlap bags were a hit with my class at Paper Cowgirls.
They were such an easy, cheap project.
I made 23 at one time!

Fun to embellish too!
So I wanted to share this little tutorial with you. 

Gather your supplies:
1 yd. of burlap would make you about 3 bags, at least.
A drop cloth.
(Ace Hardware's brand has a nice nubbiness to it.)
I wash them with fabric softener to geth them nice & soft, coffee stain them & then throw them back in the dryer. You get a lot of projects from one drop cloth!
A piece of cardboard.
I rip the backs off all my kids drawing pads, they work perfect.
(we go through a lot of drawing pads)

Rip the drop cloth to measure 18"x 11" , cut the burlap a little smaller for the fringe from the drop cloth to show through.
 I had to pull some tape off the top of the cardboard before I could fold the board in half. Make a firm fold.
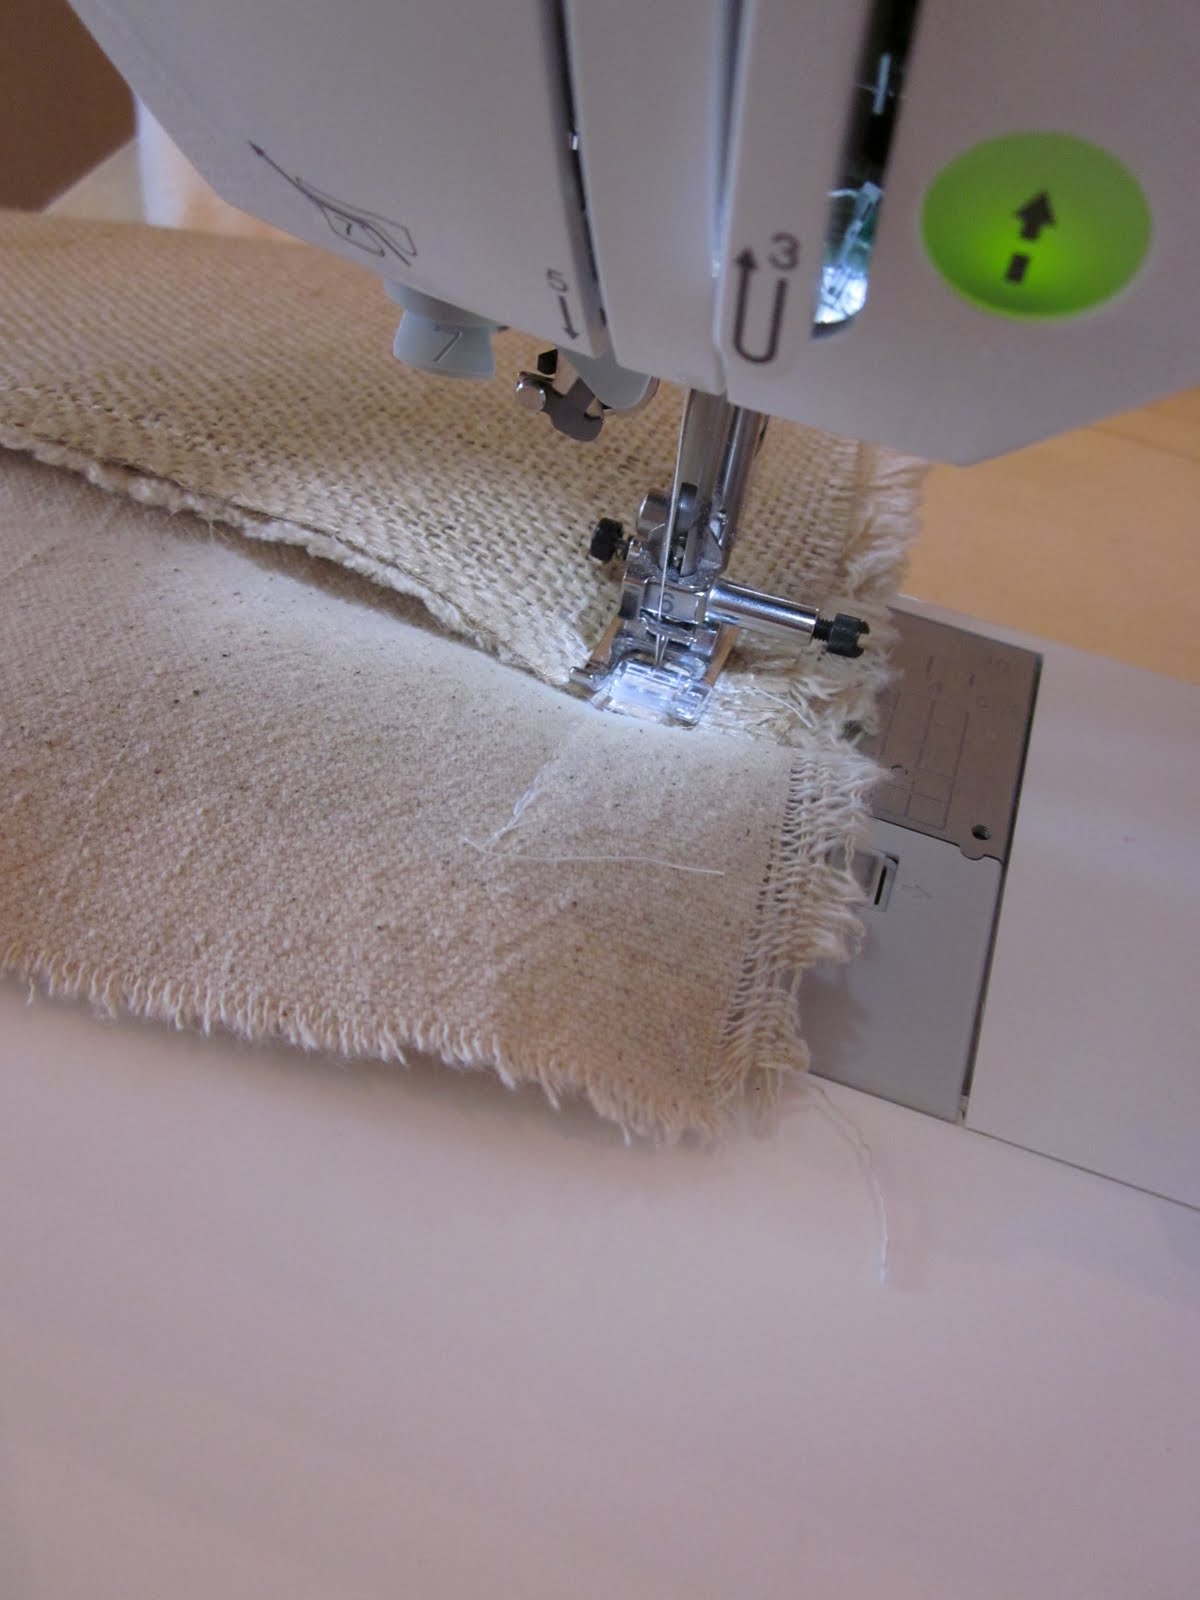
Center the burlap inside the drop cloth & sew the bottom shut.

Lay the cardboard in the center of the cloth & use a pencil to draw a line down the sides. Place pins & sew. Leave center of one end open to stuff with the cardboard.

After you stuff the pocket with the cardboard push it all the way to the bottom. At this point pull the frayed edges off the burlap till it looks good to you.
(get out your dust buster)
Then fold the pocket over and steam closed with a hot iron. When you are finished you will have a loose 3" flap, fold that over & steam shut.

You could finish the bag here with a simple button closure. Sew on some buttons & tie it shut.
(a bad demo here, but you get the picture)

If you did it this way you could maybe add a pocket or image to the inside. A message to someone??

But if your making it like mine, sew the sides using the seam from as guide.
Now pull out your stash & glam it up!

So many different ways to make it your own.
I could see Sissie doing this with pink burlap & one of her muslin flowers on the flap! Cute.

A different fabric instead of the drop cloth would be nice too.
I made a smaller one to hold my business cards. What a beautiful way to package a special piece of art or anything else.
I hope you can use this simple project sometime!

Before I go I want to share some of my PC haul with you!
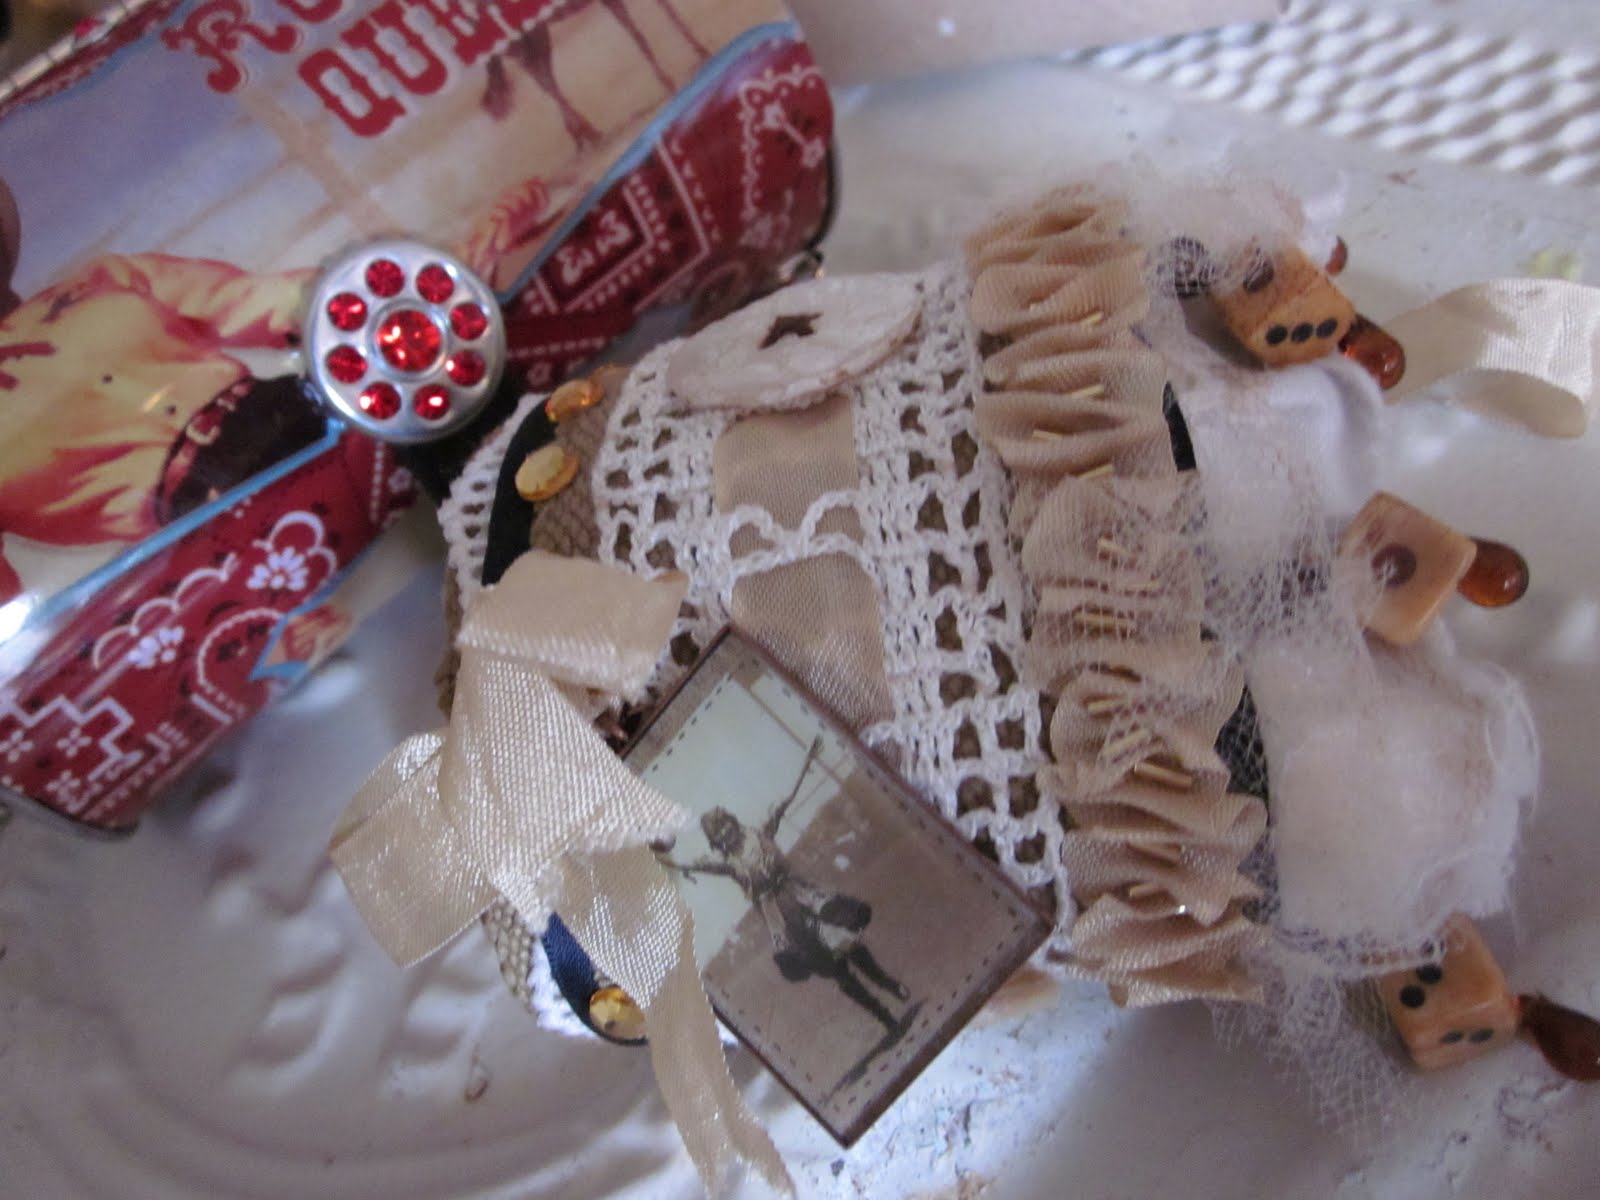
I did a cuff swap with the CRAZY talented Marie Jenkins
(sorry no blog, but I'm working on her!)
It is the most amazing piece, my sad pictures don't do it justice.
Check out the details, the charm & the tiny domino's, seed beads hand stitched.

It was packaged too cool! As if the cuff wasn't awesome enough, Marie included a darling cowgirl purse & a domino necklace.

Buttons & seam binding in the back.
This girl is so good! She did several swaps, each over the top!
Thanks Marie!

I purchased this beautiful necklace from my sweet friend & fellow teacher Angela from Filigree Moon. She has wonderful style, I can't wait to take a workshop with her at Cottage Panache. I want to learn some jewelry techniques like wire wrapping to incorporate into my art.

And Jamie from art-e-ology!
You could barely get close to her booth, between her totally amazing finds & the great prices I think she just about sold out!

The images were drop dead gorgeous!

I couldn't resist some of her one of a kind collage sheets.
Seriously cool!
~Lisa


%5B1%5D.jpg)


35 comments:
Sis,
Are you STILL teaching???
;)
I have my burlap clutch kit under lock and key...it's one of my prized possessions!!!!
I wish Marie would get a blog!!!!
LOVE her!
And...I didn't see that pretty necklace of Angela's! You must have swiped it up before the show even opened. No fair!
Jamie...Jamie...Jamie...
I miss that LURD!
:)
So what are you going to teach us next???
You know we are all your number one students!!!!
0:-)
Holy Cow Sista!
You put your comment box in a pop up window for us...
YOU
ARE
SO
COOL!!!!!
:)
A+ Teacha!
Great tutorial girl. And I love all those wonderful swaps and awesome finds! Thanks for sharing.
Thanks for the great tutorial!
xxoo
Hi Lisa!
Everyone is talking about you and the Cowgirls all over Blogland!
You are now a Rockin Bloggin Cowgirl Queen!!! YeeHaw!!
I love those burlap bags and thanks for mentioning me. I would take one of your in a heartbeat. You design much better than I do when it comes to adding all the artist touches that you are so famous for! Geeze, can I have your autograph! Because I want to be able to say, I knew Lisa when!!
Thanks for the tutorial. I bet they will be poppin up all over the place!
Big squishy hugs to you!!!
Sissie
Hi Lisa:
I love the tutorial. Thanks so much for your generous spirit. I'm going to work on my "presentation" today and hope to get it in the mail by the end of the week. I'll let you know how it goes.
Talk with you soon.
xoxo
Donna
thanks printed a copy for myself! your the best i mean your blog is the best... diane
Lisa, you're so right! Imagine the possibilities of your great tutorial! This is a stash project for sure! Thanks for sharing it!
Hugs! Diane
Hey cutie! Love your generous, sharing spirit! Thank you for the tutorial...well done. I've seen your burlap and bling creations in person, and they are fabulous!!! Thank you also for the shout out, you really wear that necklace well! Look forward to each and every post you make...and I can't wait to take one of your classes! Hugs. ~ Angela
Thanks so much for the tutorial! I was positively drooling when I saw your bags on someone's blog. Can't wait to go home from work today and get my stash together to make one!
Hi Lisa. These burlap bags are really, really cute. Thank you for sharing the tutorial with us. Love all the goodies you picked up too!
Hugs...Tracy :)
Hi Lisa-
I am so, so happy to have found you!!! Thank you for the fun tutorial. Another project to add to my ever-growing list, but I do need something fun to put my dried lavendar in!!
xoxo
lynn
Love this idea- I'm thinking they would be great with ticking, feedsacks or barkcloth, too. And I have a stupid question- where do you get burlap? Do they have it at Joanne's or do I have to go to the Tractor Supply Center?
I love all of them. Thank you for the tutorial.
Did you notice that I put the tiny bottles you commented on up for sale on my online shop? Just letting you know. xo Joan thepottingshed-anythinggoeshere.blogspot.com/
Okay Lisa...You really are the coolest artist out here! I loved these bags when Jodie showed them on her blog and now you have shared how to make them. Are you not the best?! BTW your picture at Jodie's is so darling (all of them) you are as beautiful as your art, I must say!
Thank you for the tutorial, I really want to do this. Burlap makes me nose and throat swell when I work with it...so I will be using linen, but I will try to e-mail you a pic when I get it done. Probably won't be till Winter however, but I have filed this away in my little brain.
hugs and love...
Girl, you are da bomb!
Thx so much for sharing. Jodie & I are squeez'in through the doorway at the same time to be first in line for more school'in!
HUGE Hugs!
Hi dear Lisa,
and thanks so much for sharing this wonderfull tutorial-I love what you made for the camp, I will try my hand on those darling ones.
And wow the cuff are fantastic, so creative, and full of details.
Your necklace,-could I steal it? :) yum,-love the style,and the color of it.A wonderfull good- night post for me to read, full of things to get happy dreams. Thanks sweetie.It is 11,30 evening,so good night, and happy evening for you.
Hugs and love from your far away friend.Dorthe
Those are so cool!!! I wish I could have been a cowgirl and met you, I am so sorry I missed it.
Hi Lisa,
Thanks for the great tutorial, they look fabulous. Love all your new treasures.
Debby
Love those burlap bags! You Cowgirls are a talented lot!!
Suz
AHHHH Lisa ~
I just love love the sweet burlap bags that you made ~ I want to try one soon ~
You got some wonderful treasures at Paper Cowgirls too !
Ohhh and I loved your class set up ~ it was absolutely awesome !!
xoxo
Lori
Love the contract between the lace and the burlap. These are just wonderful. Connie
Lisa, those little bags are awesome! laurie
Thank you for the tutorial. Your swap items are delicious, that cuff is amazing. It looks like you are still ridin' high from your cowgirl experience. Have a sweet day!
This is a great tutorial sweetie!!!!! I love, LOVE the way the pouches turned out and of course you made them even more wonderful with all the lace and baubles you added! They would be adorable made in a small size too ~ What a gorgeous cuff you were given and the necklace Angela created is so beautiful, and you KNOW how much I love Jamie's taste....so much goodness was a Paper Cowgirls...why wasn't I THERE???? hugs and love, Dawn
Those are Amzing- Great Idea, and so many options to embelish-make one of a kind-or to give as gifts.
Love Them!!
karryann
I'm so glad you posted the tutorial - those bags are really cute! Now you need to post a tutorial on how to build up a stadh of such great laces!
Oooh! I so have to make those burlap bags! They are too cute!
Those treasures you got from Paper Cowgirl are so pretty! I'm so loving that necklace!
Thank you so much for the tutorial, I can think of so many ways to use the clutch! They are fabulous! Theresa
Hi Lisa, I've to catch up a bit. I just love your burlap bags. Each of them is just so very beautiful! I haven't found a good source for burlap here. I have to watch out for it. Thanks for the tutorial!
What a shame that Marie doesn't have a blog yet. Her gifts to you are pretty.
I'm glad you got to buy some great things at vendor's night. When I saw the picture on Jodie's blog, I thought you were pouting because she snatched up everything you had wanted ;-).
Big hugs,
Julia
Hello Lisa, I am totaly inspired by your blog,artwork, everything!
I fell in love with your burlap bags and lo and behold at a yardsale not 20 minutes ago I found burlap. I am going to create my own bag. Thank you soooo much for the inspiration.
Diana
I love your blog!!
Lilly
super cute bags, lisa!! i am going to make some up!!
fun, fun post!!
xo
Hi Lisa,
these are just stunning - thanks for the tutorial.
Hugs,
Marie
Your burlap looks much less nubby that what I can find. Where did you purchase yours ?
Post a Comment